
3D Printing a Guitar
Post by Joey DaCosta
If you spend time simultaneously inhabiting online guitar-nerd and maker communities you’ll probably come across this project at some point: https://blog.prusa3d.com/the-prusacaster-how-to-design-and-3d-print-an-electric-guitar_71962/
Here’s a picture of the project from the Prusa blog if you don’t feel like clicking the link:
The quick summary is that someone who works for the 3D printer company, Prusa, decided to try 3D printing a guitar body. After a couple iterations it ended up working out. Allegedly. If you want to try building your own the .STL files to print the instrument are in the blog post.
I’ve never played a plastic guitar and I was curious what it would feel and sound like. I didn’t want to exactly replicate the “Prusacaster” from the blog so I decided to do a bit of a redesign. Fundamentally, what I ended up with is superficially similar – body shape, scale length, type of instrument (it’s still a six-string guitar). But with a bunch of changes to suit my tastes.
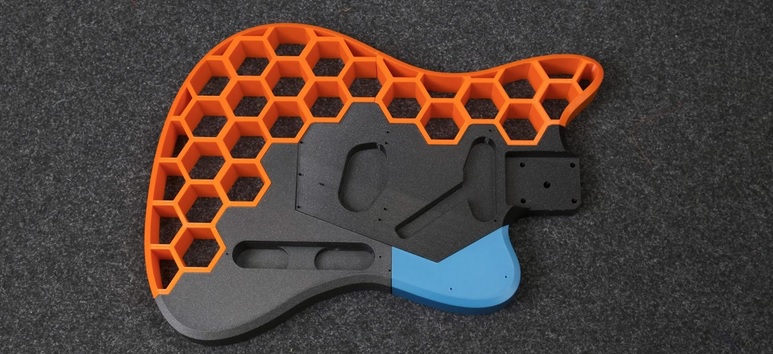
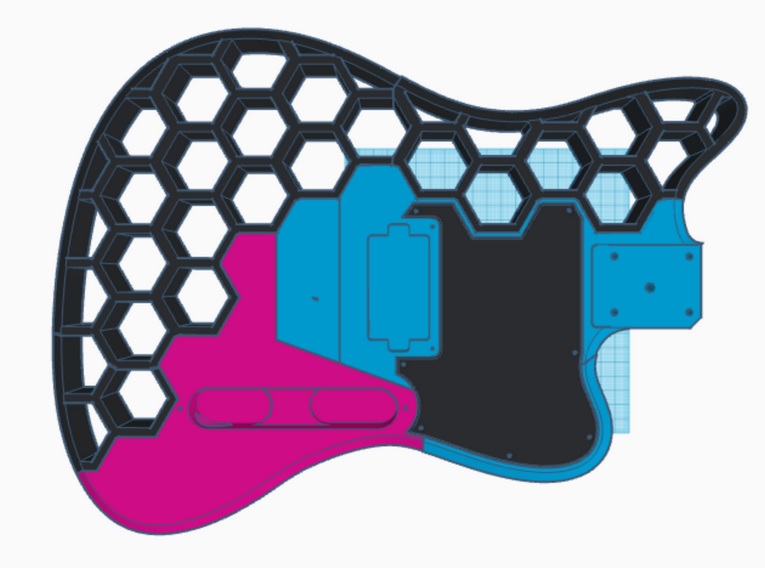
I redesigned my version to accept different pickups and hardware and removed material to create a contour to rest my arm against. Here’s everything together in Tinkercad:
It was printed in its smaller component pieces and glued together with epoxy but that’s basically “it.”
Putting the instrument together wasn’t particularly challenging, just time consuming. Most of the pieces took 20+ hours to print, which meant printing on holidays and weekends to avoid disrupting printer availability – it’s one of the most popular services in the makerspace. I made a few mistakes while I was designing it and a few more during the assembly but it mostly went smoothly.
This is what it looks like finished:
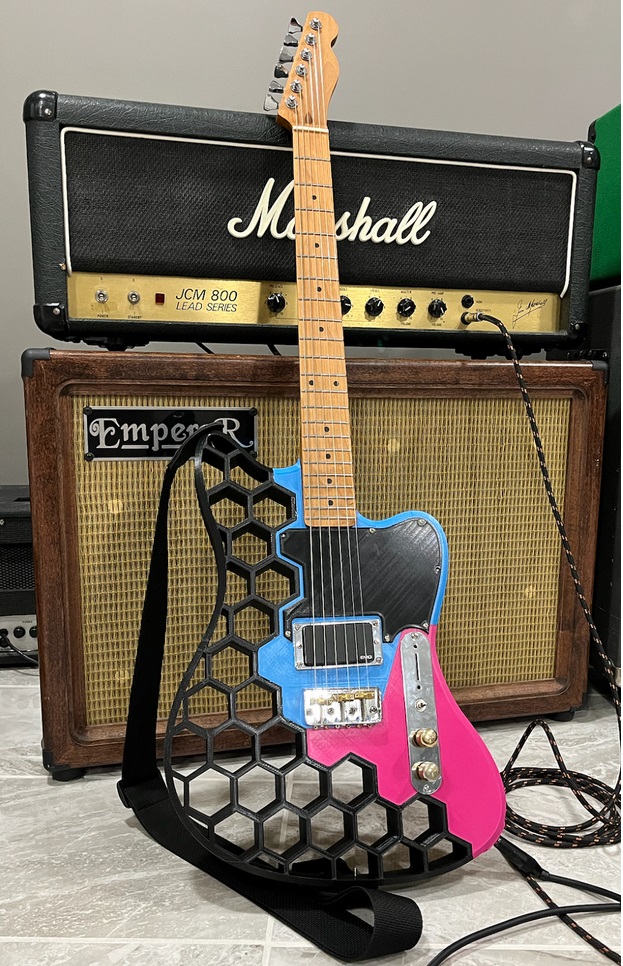
The guitar is mostly air so it shouldn’t have been a shock that it’s very resonant (but it was). That’s not a very important quality in an electric guitar, but it was the initial thing I noticed when I strummed a chord for the first time. I’m a bit dubious of the materials. It goes out of tune faster than other instruments I’ve played (it has locking tuners, so the strings slipping shouldn’t be a problem) and the tension across the strings feels off. I didn’t have a drill bit long enough to drill through the body so I’m loading the strings through the top of the bridge (rather than through the body). That might be part of the problem.
I think my control plate looks a bit wonky. I had a spare pickup kicking around but, unlike many other pickups, it needs a 9v battery to function. That battery is jammed at the top end of the control cavity (under the empty part of the silver plate) so I couldn’t put anything else in there. Eventually I’ll swap the pickup out and put in a bridge and neck pickup. The spot where the picking arm rests is a bit of a problem. The surface is rough and after a few minutes of playing you can feel the plastic abrading your forearm.
The neck was a cheap one that I got during a boxing day sale. The frets are a bit uneven but it plays well enough. I spent quite a bit of time sanding it to make sure it felt smooth and fast. I am fortunate enough to have access to a bandsaw so I was able to cut the headstock out so it isn’t a wacky paddle shape (like the Prusa guitar).
It sounds like an electric guitar. No surprises here. Some people think the body/neck materials have a major impact on how an electric instrument sounds. That they can somehow hear the difference between something made out of mahogany vs. something made out of alder. As if the years they’ve been playing music and irreparably damaging their hearing never happened. As if all the rules of physics that dictate how electro-magnetic fields interact with a conductor and pass a signal along to an amplifier can be bent by marketing. It’s absurd.
Here’s a clip I recorded. I didn’t do any editing or retakes, the bass is improvised, and the drums sound a bit off because I’m out of practice. If you don’t listen for mistakes it’ll sound fine.
Problems (and how they were solved)
I wanted to talk about a few of the issues I ran into. I think learning about how other people troubleshoot is the most valuable thing about a blog post like this.
The bridge:
The original Prusacaster design was built around a Harley Benton, “T-Style” kit, so the designer wouldn’t have to sort out hardware or sourcing a guitar neck. I used a different bridge pickup so I needed a different bridge. Bridge hardware isn’t standardized so I did away with the holes knowing I could just drill whatever I needed later (the Makerspace has tools to do this!).
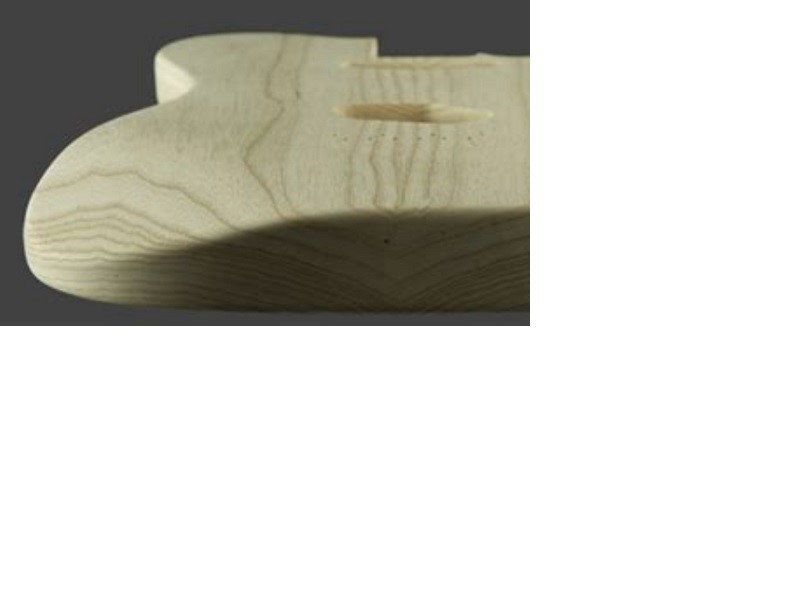
I was also dubious about the placement of the bridge screws. Here’s a picture for reference:

There are three holes on the left side of that turquoise piece that are meant to hold the guitar bridge in place. I was concerned they could be a point of failure and it was unlikely that I’d find a bridge to fit this specific screw spacing (guitar companies don’t hold to any one standard), so I removed them and gave the issue no more consideration. Here’s my body design for contrast:

I had forgotten that a “hole” on a 3D print is reinforced with extra plastic. I printed my guitar body with 25% infill, meaning the interior of the print is 25% plastic structure and 75% air. I couldn’t screw a bridge down because there wasn’t enough plastic for the screw to bite into and hold.
Thankfully, some enterprising European chemist(s) invented epoxy in the early 20th century to help solve problems just like this. Epoxy is sold at most hardware stores. It’s usually a tube of resin and a tube of hardener. One of them smells really bad. When they’re mixed together it immediately begins to set up and, once it’s hard, creates an extremely strong bond.
After doing some measuring – I had to find the center point of the guitar body and identify the correct distance between the bridge and nut (the two points the guitar strings contact at either end of the instrument) – I drilled ½” holes where I’d be screwing the bridge down. I had picked up a ½” dowel (they’re sold referencing the imperial measurement – I’m not using inches willingly here) and cut 38mm segments off. I filled the holes with some epoxy, jammed the dowels in, let it cure, and carefully trimmed any pieces of dowel sticking up with a chisel. With wood glued into the body the bridge screws had a solid contact point to dig into.
You can use this method for fixing any number of things. If there’s a hinge ripping out of a cupboard you can do the same thing. Drill the screw hole out, fill the hole with some epoxy, jam a piece of dowel in, let it cure for about 24 hours, and then screw the hinge back in. I mixed too much epoxy for my guitar bridge plugs so I used the excess to fix a cabinet door my kid had dangled from and ripped out. It took less than five minutes.
I had my reservations about the ergonomics of the design. If you think about how someone rests their arm as they play and then look at the picture it might be apparent why (I haphazardly circled the area in yellow):
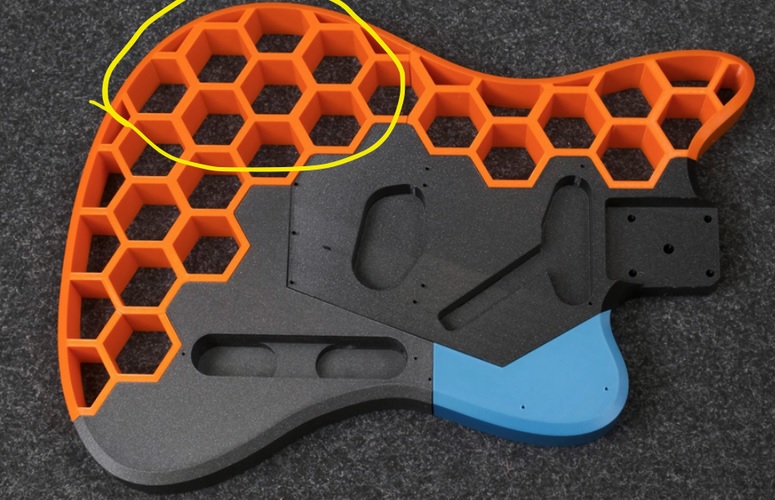
There are a ton of edges. Edges don’t feel great.
I tried to improve my version by rounding off the area circled in yellow, just like the guitar it’s based on. This was surprisingly frustrating. Tinkercad is a bit janky when it comes to creating curved surfaces. I wanted to remove material and end with a convex shape, sloping from the flat top of the body down to the top-left edge. Like this:
Tinkercad has a bunch of convex shapes to choose from but no concaves. You end up having to use holes to mirror curves onto a different shape. It involves a ton of rotation. Then things get all screwy when they get stretched into position. Tinkercad fixes their workplane. If you turn an object 45 degrees relative to the x,y plane any dimensional changes still occur on that plane – the plane doesn’t shift 45 degrees with the object. If you’re working with a rectangle shape, applying changes to an axis stretches the shape into a trapezoid. For whatever reason my brain can’t accept this. Probably because it involves planning ahead and that’s just not acceptable. After nearly wearing out the undo shortcut on my keyboard trying to get the curve just right, I opted to just cut away a flat planar surface that I could sand into a smooth transition later.
I sanded it. It still feels bad. Moral of the story is that cutting away material where a body part is supposed to rest might look cool but it feels bad. I mostly play this guitar while wearing long sleeve shirts or sweaters.
Conclusion
3D printing a guitar was fine and I think it turned out well but I don’t want to do it again. I’d rather build one out of wood.


Is there a way to make this body into a bass??
Hi Jason, you can certianly edit the design to make it a bass! The blog post has a link to the original design, and the librarian who made this project discusses some ways he used CAD software to make edits to the design. I’m positive you would be able to make edits for it to be a bass! If you would like to discuss this more or get in touch with the creator of this project, feel free to email us at makerspace@tru.ca